From time to time you may need to review some of the key areas of RMEx. The following “tour” will take you through the major areas of the system. You will need to be signed into your AS/400 and RMEx with a User ID that has authority to access all of the different areas of the system. If you have just installed RMEx, you could sign on with the User ID QMASTER. You will need to obtain the password from a security administrator. To make sure that you do not accidentally change any important information, you should be signed into a test company. Some of the screens may be from an older version of the system.
If you would prefer a web-based demonstration of RMEx that does not require an AS/400, please click here.
Understanding account information
This area will help you to understand the type of information we store about a debtor and the individual accounts for a debtor. RMEx allows you to “link” multiple accounts for the same debtor and to view and work them as a “group”.

- To go into account inquiry, from any RMEx menu, key in “I” at the “Ready for Option” prompt and press ENTER.
- You are taken to the search screen of Account Inquiry. Let us perform a name search by keying in “02” in the Search Type and “JONES” in Search data. Press ENTER.
- Up to 5 accounts are displayed. These are individual debts. Select the first account on the screen by keying in “1” in Select Line Number.
- This is the Account Detail screen.
- Press F10 to display the second part of the account information. Press F10 to return to the Account Detail screen.
- Press F5 to display linked accounts for the debtor (multiple cases for the same debtor).
- Press F7 to return to the Account Detail screen.
- You can page up and page down to read more notes. If you would like to see all of the notes on a single screen, press F11. Press F7 to return to the Account Detail screen.
- Press F2 to display the Attorney window. Press F7 to return to the Account Details.
- F4 will display the Skip-tracing window. Press F7 to return to the Account Details.
- If you would like to have an idea of the detailed legal information that can be stored, press F6. Press F7 to return to the Account Details.
- F8 will display an Additional Contacts window. Press F7 to return to the Account Details.
- To display the Payment Arrangement set-up screen, use F9. Press F7 to return to the Account Details. You can also set up a series of direct checks and create a financial profile for the debtor.
- Use F16 to display additional information about the account. The screen that is presented will depend on the type of client. As an example, if the client is a medical client, you will see an insurance screen. For medical accounts, we can also keep 1500 and UB92 information. From the insurance screen, you can use F3 and F4 to display these windows. Press F7 to return to the Account Details.
This should give you a good idea of the debtor and account information that is maintained within RMEx.
The knowledge base
This is the area that allows a user to set up the knowledge and rules that will be used to make decisions. Collectors would not usually have access to this area. It would only be available to management. From any menu, press 22 to return to the Main Menu and then select Option 1, System Control Menu.
- Select any option to get an idea of the decision-making capabilities and flexibility offered by the system. You can always exit a selected operation by using F7.
- Select Close Codes (Option 4). Use F3 to search, and select any code. Think about the flexibilty offered.
- Select Contact Series (Option 10). This allows you to set up an automated series of letters and/or phone calls. Use F3 to search and select any code. As an example, you could have letters being sent on accounts without phone numbers, but letters and phone calls on accounts with phone numbers. The accounts would be automatically sent to the dialler at the appropriate time.
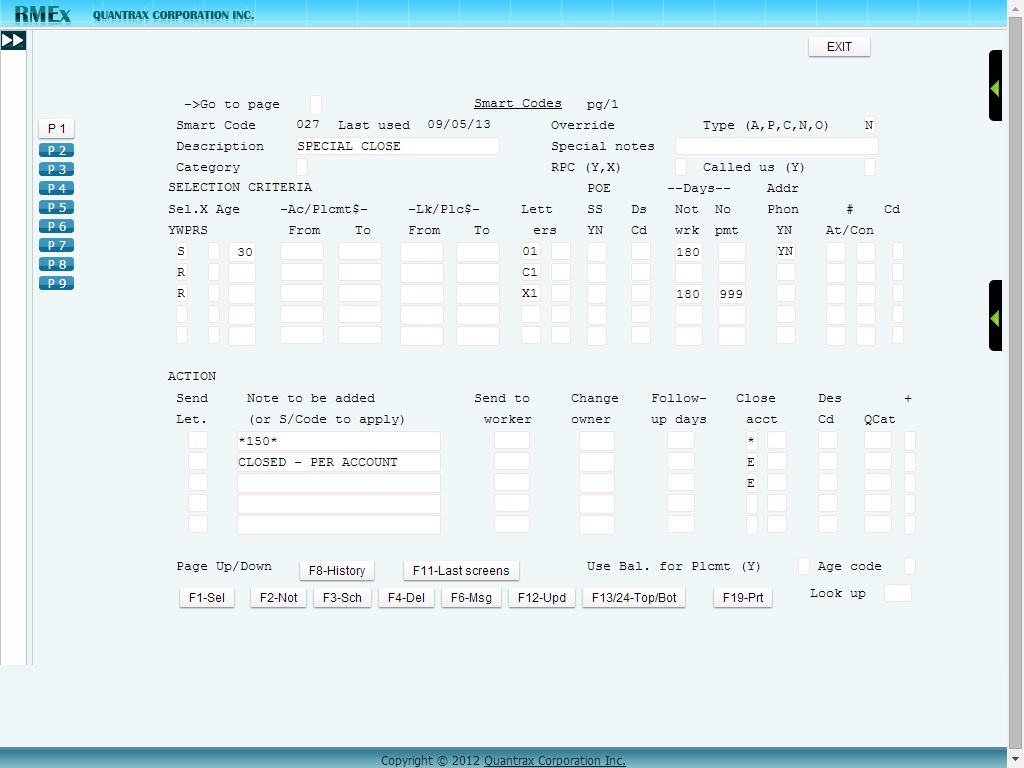
- Make sure you have looked at Smart Codes, Option 15. This will give you a good idea of some of the “thinking” that can take place within the system.
- To view some of the field-level help text, tab to any field and press the “Help” key. If you are using a PC, you may need some help identifying this key.
- Option 21 from the System Control menu (Additional System Control Options) will display more areas where rules can be defined.
Something about collector queues
During Nightly Processing, the system analyzes all open accounts, filtering out payment arrangements, future promises etc. and creates work queues (or Processing Types) for each worker. It is not only collectors who work accounts! Accounts can be routed to managers, supervisors, skip-tracers, client service representatives etc. for action.
- If you are not signed on as a user who has accounts to be worked, you may want to have someone sign you on as a collector who has accounts in their queue.
- If you are not at the Account Processing menu, go to the Main Menu (Option 22) and then select Option 5 for Account Processing.
- Now select Option 1 (Display accounts to be worked).
- Review the different Processing Types.
- Press F2 to display the “Work Map” for the user. This shows how the accounts have been classified within each Processing Type and QCat (sub-classification within a Processing Type). Press F7 to return to the previous screen.
- The user selects the Processing Type, QCat and time frame, and the accounts are presented for follow-up and appropriate action.
- At this time you should sign off if you had signed on as a collector, and sign back with the User ID that allows you to access all areas of RMEx.
- In what order are accounts presented within a Processing Type? Go to the Main Menu (Option 22) and then go to the System Control Menu (Option 1). Select Option 21 for Additional System Control Options. Now select Option 2, QCat codes.
- Select Option 1, the option that says “By Company”.
- Press ENTER when asked for a code. This is the “Standard” QCat 000. As you can see, there are many options for sorting accounts. Consider the benefits of the “Breakpoint days” feature. You could sort a group of accounts, based on when they were last worked. You could first present the accounts which were not worked within the last 15 days, in descending balance, followed by all the other accounts, also sorted in descending balance. (In effect, you have two queues within a single queue!) This would ensure that the larger balances were always worked every 15 days.
- What happens if your collectors have too much flexibility in deciding when they should be working each Processing Type? You can manage their choices! Go to the Main Menu, and select Option 2, Management Menu.
- Select Option 13, Set Processing Time by Type. Press F3 to display the list of users who may have been set up. If there are items in the list, select one, by keying any character to the left of the User ID. If there are no entries in the list, press F1 and then key in a User ID (say QMASTER) in the input field and press ENTER. Review the screen. You can define when a user can or cannot be in specific processing types. As you will see there are other options too. Press F7 to exit.
Some management options
Let us show you a few management options.
- Go to the Management Menu. (Option 2 from the Main Menu)
- Select Option 2, Client Inquiry. Use F3 to search for a client and display the screens. Feel free to use some of the function keys within the screens. Press F7 to exit.
- Select Option 4, Collector Inquiry. Use F3 to display the search option and press ENTER to display collector information. Select a collector and review the screens. Press F7 to exit.
- Select option 14 – Account Processing Review. Then select Option 1 – Account Processing Review by User. This will give you an idea of some of the Productivity Reports that are available.
- Many of the reports we have for individual clients or groups of clients, can also be run for a company. This will give you a picture of the entire operation. Select Option 20, Company Statistics from the Management Menu. This will give you an idea of the available options. Select Option 1 if you would like to view the key company statistics on a single screen.
- You have an idea of how powerful Smart Codes can be. How would you apply a Smart Code to a large group of accounts? E.g. You want to send a letter on a selected group if accounts and close those accounts. You know how to set up a Smart Code, but how do we apply that Smart Code to 5,000 accounts?
- Go to the Main Menu, and select Option 7, Special Options Menu. Now select Option 3 – Multiple Smart Code Assignment. Select Option 1, Placement date range. You will be prompted for a Password. That password is defined in the Company Information System Control file. You can get it from someone who knows it, or go to the System Control Menu, select Option 2 and change it.
Once you have entered the Password on the Multiple Smart Code Assignment screen, you will see the selection options for “identifying” the group of accounts. This is very flexible and allows you to easily manipulate large groups of accounts! Use F7 to exit.
Reporting Capabilities
RMEx has extensive reporting capabilities. You can review some of the key reports by going to the Periodic Reports Menu. (Option 14 from the Main Menu)
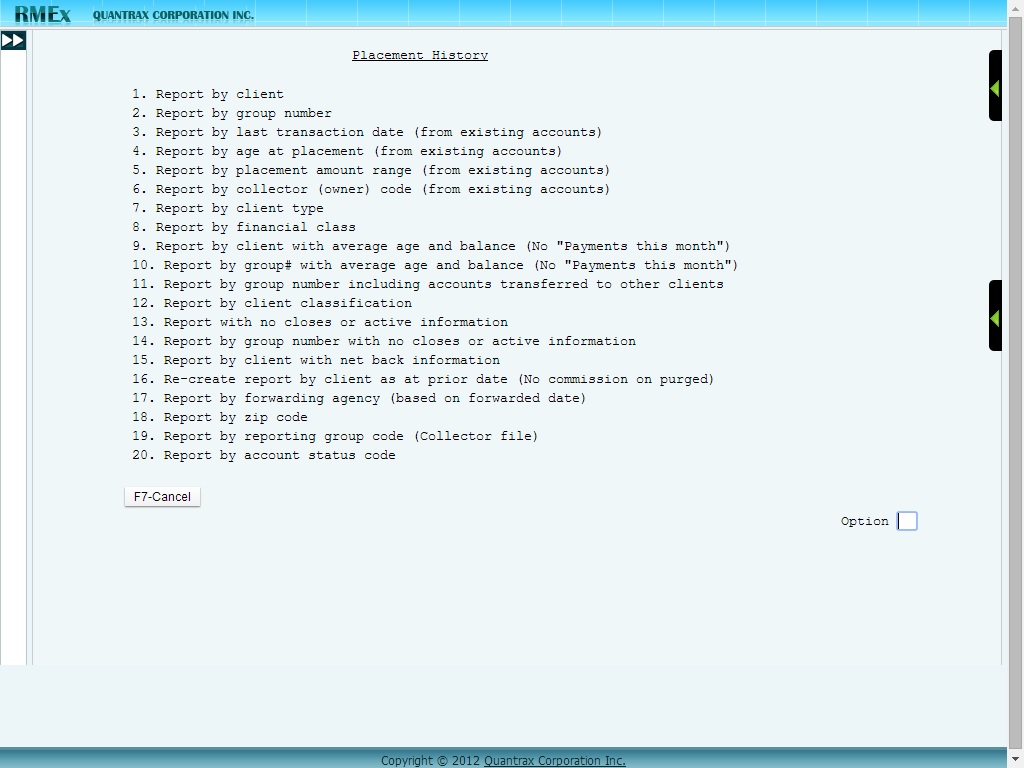
- To give you an idea of the flexibility of the base package, select Option 15 from the Periodic Reports Menu, the Placement History. This is a report that analyzes information by placement period.
- Look at the choices. Remember, this is just one report! In the base system you have all of these variations of this single report! Within each option, there are further choices, because you can select a “Report Type” which defines the specific columns and calculations within the report!
Our on-line training modules
We wanted our educational material to be accurate and up-to-date. This is not possible with paper-based documentation. We are committed to maintaining system-based documentation for all areas of the package.
- Go to the Account Processing Menu – Option 5 from the Main Menu.
- Select Option 12 – Collector Training. Select option 1 – Work with Complete Module.
- Press ENTER and review some of the screens. This is documentation with actual pictures of screens! Press F7 to exit.
Some technical information
For those of you who are technically inclined, our base code is in a library called SCLIB. Most of the programs are written in RPG/400, with some ILE programs.
- The DDS for the files is in QDDSSRC.
- Some key files are SCACCT (Account file), SCNOTE (Notes), SCPAYM (Payment History), SCCLNT (Client file), SCCOLEC (Collector file) and SCPLHS (Placement History).
- Our electronic loads (for new accounts) use standard transaction files. There are many transaction files to accommodate the different types of information. The following will give you an idea of the information that can be accommodated. SCATRNTL (Account information), SCATRN3M (Medical Insurance Information), SCATRN4 (Additional medical information), SCATRN5 (Co-maker information), SCATRN6 (notes) and SCATRN7 (Additional contacts).
- Our standard data library is SCDATA. This is where files are stored.
- Your custom modifications are stored in SCMOD.
- The naming conventions are QRPGSRC for RPG source, QCLSRC for CL programs, QDDSSRC for the source for data files and QDDSSRCS, the source for display files.